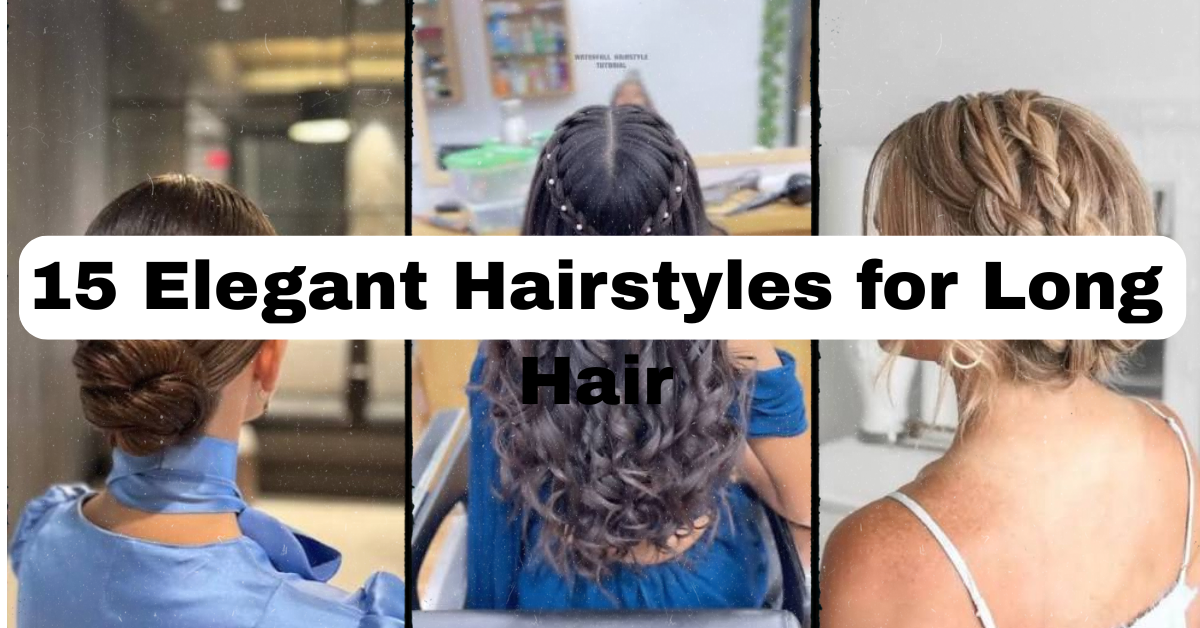
15 Elegant Hairstyles for Long Hair
I have been experimenting with different hairstyles over the years, and I’ve also had my fair share of conversations with the hairstylists. But unlike what most people do, I don’t believe in only picking from photoshoots that have an army of stylists working behind the scenes. No, I know for a fact what works when it comes to choosing the right hairstyle for you.
In case you were wondering, here is the list of elegant hairstyles for long hair. The elegant hairstyles for long hair that work include low bun, waterfall braid, textured half-up-do, and cascading soft curls. What makes these hairstyles elegant is the fact that they offer a combination of class and movement.
But wait there, folks. In this article, I am going to take you through 15 elegant hairstyles for long hair.
Why Long Hair Deserves These Elegant Styles
Long hair gives you options. Lots of them. You can braid it, twist it, pin it up, or let it flow. But here’s the thing, not every “elegant” hairstyle actually works for every hair texture or face shape. I’ve seen too many articles just list pretty pictures without telling you if the style will actually hold on fine hair or look right on a round face. That’s not helpful. Below, I’m breaking down each style with the details that matter: hair type, texture needs, face shape compatibility, and how long it’ll realistically take you to create.
1. Classic Low Bun
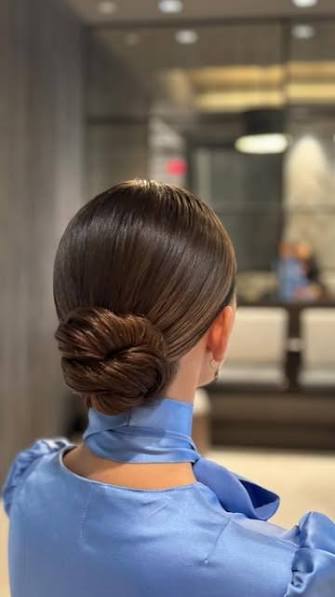
The low bun never goes out of style, and there’s a reason for that. It’s clean, it’s sophisticated, and it works whether you’re heading to a wedding or a work meeting. The technique is simple: smooth your hair back into a low ponytail at the nape of your neck, twist it into a coil, and pin it flat against your head.
This style loves straight to slightly wavy hair with medium to fine texture. Thick, curly hair can work too, but you’ll need a strong-hold gel to tame flyaways. Use a smoothing serum first, then a boar-bristle brush to get that glassy finish. For round or heart-shaped faces, keep a few loose strands near your temples to soften the look.
This is your go-to when you want zero fuss and maximum polish. Next up, a style that adds a little movement without sacrificing that same clean feel.
2. Waterfall Braid with Loose Waves
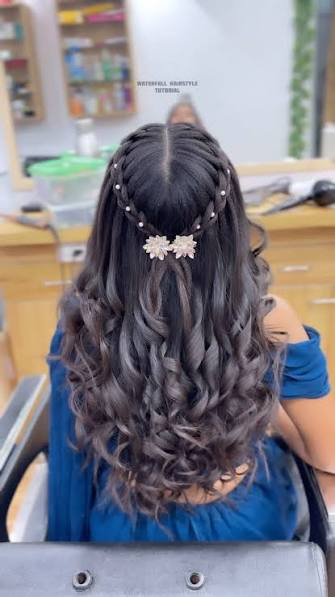
The waterfall braid looks complicated, but honestly, it’s just a braid where you drop strands as you go instead of weaving them all the way through. Start at one side of your head, braid a small section, and let pieces “fall” out with each stitch. Those dropped strands blend right into loose waves underneath.
This works beautifully on medium to long hair with natural wave or curl. If your hair is pin-straight, curl it lightly with a 1-inch wand before starting the braid, it’ll hold the shape better. Fine hair benefits from a texturizing spray beforehand to give the braid something to grip.
I love this one for outdoor weddings or garden parties. It’s romantic without trying too hard. Now, if you want something with even more drama, let’s talk crowns.
3. Braided Crown
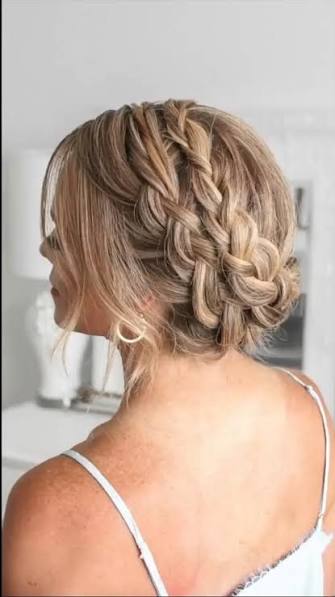
A braided crown wraps around your head like, well, a crown. You section your hair into two parts, Dutch braid each side, then cross them over the top and pin them in place. It sounds tricky, but once you get the hang of Dutch braiding, it’s actually pretty forgiving.
This style is fantastic for thick or medium-density hair. Thin hair can still pull it off, but you’ll want to tease the braids slightly before pinning for extra volume. It flatters nearly every face shape because the braid sits up and away from your face, drawing attention to your eyes and cheekbones.
Bring bobby pins that match your hair color, clear ones work too. This look holds all day, which makes it perfect for festivals, formal events, or even a long work shift where you need your hair out of your face. Speaking of low-maintenance options, here’s one that takes five minutes flat.
4. Sleek High Ponytail
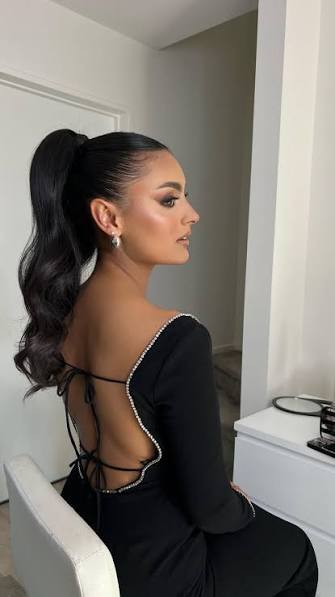
Don’t underestimate a ponytail. When it’s done right, sleek, tight, and positioned high on your head, it instantly looks more elevated than your average gym look. Brush your hair back with a paddle brush, secure it high, and wrap a small piece of hair around the base to hide the elastic.
This style is ideal for straight, fine to medium hair. If your hair has natural texture, flat iron it first for that glass-like sheen. High ponytails elongate round and square faces especially well because they draw the eye upward and vertically.
Add a silk scrunchie or a decorative hair tie if you’re dressing it up for an event. This is my go-to when I’m short on time but still want to look put-together. Now let’s slow things down with something a bit more textured and undone.
5. Cascading Curls with Face-Framing Layers
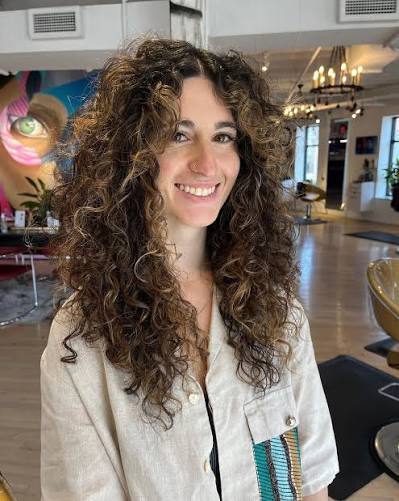
If you have layers already cut into your hair, this style shows them off beautifully. Curl your hair in alternating directions using a curling wand, then run your fingers through the curls (never a brush) to loosen them into soft waves. The face-framing layers fall naturally around your cheeks.
This works best on hair with some existing layer structure, medium to long length, and medium-to-thick density. Fine hair can still achieve this look with a volumizing mousse applied to damp hair before curling.
Oval, heart, and long face shapes all benefit here because the layers soften angles and add width near the cheeks. This is a strong choice for date nights or holiday parties where you want movement without a strict updo. Next, let’s talk about a twist on the classic bun that adds a little edge.
6. Twisted Low Chignon
A chignon is basically a fancier, twisted version of the bun. Instead of a simple coil, you twist sections of hair before wrapping them into a low knot at the nape of your neck. It creates texture and dimension that a plain bun just doesn’t have.
Medium to thick hair holds this shape the best, though fine hair can work with the help of a texturizing spray and a few bobby pins for security. This is genuinely one of the most versatile face-shape options it suits oval, square, and diamond faces particularly well since it exposes the jawline and neck.
I recommend backcombing slightly at the crown before twisting for extra lift. This is a strong option for black-tie events or formal dinners. If you want something a little more playful but still elegant, try this next braid.
7. Fishtail Braid Updo
The fishtail braid has a delicate, woven look that’s actually easier to create than it appears. Split your hair into two sections, then take small pieces from the outer edge of each section and cross them to the opposite side. Once you’ve braided most of your length, coil the braid into a bun and pin it.
This style shines on hair with some natural texture and works for fine to thick densities alike. If your hair is very slippery or fine, a texturizing spray is your best friend here, it gives the braid something to hold onto.
Fishtail updos are wonderful for bridesmaids, proms, or any event where you want intricate detail without a full-blown formal updo. Let’s shift gears to something with a boho feel next.
8. Boho Half-Up Braid with Loose Waves
This one’s for anyone who wants elegance without looking overly formal. Take a small section from each side of your head, braid them loosely, and connect them at the back with a clear elastic. Leave the rest of your hair down in loose waves.
Wavy or curly hair types work best here since the texture blends naturally with the braid. Straight hair can still pull it off with a texturizing spray and a loose curl added beforehand.
This half-up style softens angular face shapes like square or rectangle, since the braid draws focus upward while the waves soften the jawline. It’s a great pick for outdoor events, brunch dates, or casual-but-cute workdays. Now, let’s talk about a Dutch braid technique that takes things up a notch.
9. Dutch Braid into Low Ponytail
Dutch braids sit on top of the hair rather than underneath, which gives them a raised, sculptural look. Start a Dutch braid at your hairline, work it back toward the crown, then gather the remaining length into a low ponytail.
This style is fantastic for thick, coarse, or curly hair because the braid holds its shape well and doesn’t fall flat. Fine hair can still achieve this with dry shampoo added at the roots before braiding for grip.
Round and oval face shapes look especially balanced with this style since the braid adds height at the crown. This is a smart choice for workouts that transition into evening plans—it holds up surprisingly well. Next, we’re going full glam with a vintage-inspired option.
10. Vintage Finger Waves
Finger waves bring old Hollywood glamour into modern styling. Using a fine-tooth comb and styling gel, you shape S-patterns into damp hair, then pin each wave until it dries completely. Once set, you unpin and gently comb through for definition.
This look works best on straight to slightly wavy hair with medium length. Curly hair can be flat-ironed first to create a smoother base for the waves. Oval and heart-shaped faces suit this style beautifully since the waves create soft angles near the cheekbones.
Patience is key here, this isn’t a five-minute style. It’s ideal for themed parties, formal galas, or photo shoots where you want serious drama. Moving from vintage to modern, let’s look at a textured ponytail with a twist.
11. Textured Ponytail with Bow Accent
This style takes the classic ponytail and dresses it up with a ribbon or fabric bow wrapped around the base. Add loose waves throughout the ponytail length using a curling iron, then tease the crown slightly for volume before securing.
Medium to long hair with some texture works best, though this style adapts well to nearly any hair type with the right prep. Fine hair benefits from a volumizing spray at the roots before pulling back.
This playful-meets-elegant combo suits round and oval faces particularly well. It’s a favorite for birthday parties, brunches, and semi-formal gatherings where you want a touch of whimsy. Let’s move into an updo that highlights natural texture.
12. Curly Updo with Pins
If you have natural curls, this style celebrates that texture instead of fighting it. Gather your curls loosely at the crown, twist gently, and secure with decorative pins, allowing a few curls to spill out around the edges.
This is specifically designed for curly to coily hair types, medium to long length. Avoid brushing curls dry, finger detangle instead to preserve the natural pattern. A curl-defining cream applied on wet hair beforehand makes a huge difference.
Square and diamond face shapes look wonderful here since the loose curls soften strong jawlines. This style is perfect for weddings, especially for curly-haired guests who want elegance without straightening their natural texture. Now, let’s talk about a sleek option for straight hair lovers.
13. Sleek Straight with Deep Side Part
Sometimes elegant simply means sleek and polished. A deep side part instantly changes the shape of your face, and pin-straight hair with a glossy finish reads as effortlessly chic. Flat iron your hair, apply a shine serum, and part it deeply to one side.
This works best on naturally straight or lightly waved hair. Curly hair needs a good flat-ironing session with heat protectant first. Round and square face shapes benefit most, since the deep part creates asymmetry that slims the face visually.
This is a low-effort, high-impact option for job interviews, dinner dates, or any time you want to look sharp without spending an hour styling. Let’s finish strong with two more showstopping options.
14. Twisted Updo with Loose Tendrils
This updo combines twists instead of braids for a softer, more romantic finish. Twist sections of hair around each other, pin them into a loose bun, and pull a few tendrils free around your face and neck.
Medium to thick hair holds this shape most reliably, but fine hair can work with texturizing spray for grip. Oval, heart, and long face shapes look particularly balanced here since the tendrils soften the frame of the face.
This is one of my favorite bridal or formal-event styles because it looks intentional but never stiff. And for our final style, let’s go full boho-glam with braids and flowers.
15. Boho Braided Half-Up with Flowers
This style takes the half-up braid and adds small flowers or hair vines woven through for a romantic, whimsical finish. Braid two small sections from each side, connect them at the back, and tuck in fresh or faux flowers along the braid.
Wavy and curly hair types pair naturally with this boho aesthetic, though straight hair can be curled beforehand for a similar effect. This style flatters nearly every face shape since the flowers draw the eye without altering face proportions.
This one’s a showstopper for outdoor weddings, garden parties, or summer festivals.
Comparing These Elegant Long Hairstyles
| Hairstyle | Best Hair Type | Best Face Shape | Styling Time | Maintenance Level |
|---|---|---|---|---|
| Classic Low Bun | Straight, fine-medium | Oval, heart | 10-15 min | Low |
| Waterfall Braid | Wavy, medium-thick | Round, square | 15-20 min | Medium |
| Braided Crown | Thick, medium | All shapes | 20-25 min | Medium |
| Sleek High Ponytail | Straight, fine | Round, square | 5-10 min | Low |
| Cascading Curls | Layered, medium-thick | Oval, heart, long | 20-30 min | Medium |
| Twisted Chignon | Medium-thick | Oval, square, diamond | 15-20 min | Medium |
| Fishtail Updo | Fine-thick, textured | Most shapes | 20-25 min | Medium-High |
| Boho Half-Up Braid | Wavy, curly | Square, rectangle | 10-15 min | Low |
| Dutch Braid Ponytail | Thick, coarse, curly | Round, oval | 15-20 min | Low-Medium |
| Vintage Finger Waves | Straight, wavy | Oval, heart | 30-40 min | High |
| Textured Bow Ponytail | Medium-long, textured | Round, oval | 15-20 min | Medium |
| Curly Pinned Updo | Curly, coily | Square, diamond | 15-20 min | Low-Medium |
| Sleek Straight Part | Straight | Round, square | 10-15 min | Low |
| Twisted Updo w/ Tendrils | Medium-thick | Oval, heart, long | 20-25 min | Medium |
| Boho Braid w/ Flowers | Wavy, curly | All shapes | 15-20 min | Low |
Tips for Success
Let me save you some frustration. Here’s what actually makes these styles work in real life:
- Prep your hair the night before. Second-day hair holds curls and braids far better than freshly washed hair.
- Invest in a good texturizing spray. It’s the secret weapon behind almost every braided or twisted style on this list.
- Match your bobby pins to your hair color. It sounds small, but it makes updos look far more polished.
- Use heat protectant every single time you use hot tools. Long hair takes years to grow back—protect it.
- Practice before the big event. Try your chosen style a few days early so you’re not stressed the morning of.
Common Mistakes and How to Avoid Them
I’ve made every one of these mistakes myself, so let me help you skip the learning curve.
Mistake #1: Skipping texturizing product on freshly washed hair.
Clean hair is often too slippery to hold braids or twists. Fix this by adding dry shampoo or texturizing spray at the roots before styling.
Mistake #2: Pulling styles too tight.
Overly tight buns and ponytails cause headaches and can even lead to hair breakage over time. Loosen your grip and let the style breathe a little.
Mistake #3: Ignoring face shape when choosing a style.
Not every style flatters every face. Use the table above to guide your choice instead of just picking whatever looks pretty online.
Mistake #4: Using the wrong pin type for your hair texture.
Bobby pins work great for fine, straight hair. Thick or curly hair often needs stronger hold pins, like U-shaped pins, to stay put.
Mistake #5: Not accounting for humidity or weather.
Outdoor events call for stronger hold products. A lightweight hairspray works indoors, but you’ll want something heavier-duty for humid or windy conditions.
Wrapping It Up
There you have it—15 elegant hairstyles for long hair that actually work, whether you’ve got fine strands, thick curls, or something in between. I’ve tried to give you the real details: which face shapes each style flatters, what products you’ll need, and how long you should expect to spend in front of the mirror.
At the end of the day, the best hairstyle is the one that makes you feel confident and doesn’t require you to fight your natural hair texture. Pick one, practice it a few times, and you’ll have a go-to elegant look ready whenever you need it.