20 Mid Length Hair with Face Framing Layers That’ll Change How You See Your Reflection
Over the years, I’ve learned exactly what gives a haircut the right effect and what only looks good from a salon chair in flattering lights. As for mid length hair with face framing layers, I know which styles will look good even on a gloomy Tuesday, which ones will look great with a diffuser only and which ones are just pictures for your Instagram feed until lunch time.
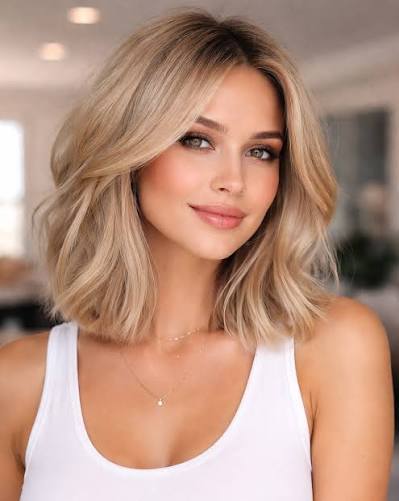
So, what is mid length hair with face framing layers? This is a hairstyle of medium length, where layers of shorter hair are cut around the face, starting from the cheekbones or jawbones to show off features, add dynamics and make the silhouette softer. This style can be applied to all types of hair.
But don’t leave, since there is more than just a bunch of pretty pictures. Here I will analyze the face shapes that will suit each cut best, products you will need, time for daily styling and mistakes that can ruin an amazing cut.
What Makes Face-Framing Layers Actually Work
Now then, let’s get back to the basics for a moment. Layering does not mean “shorter hair at the front of your face.” There is an art and science behind this look. The professional hair stylist will first take into account the shape of your face, the thickness of your hair, and where your natural part falls before cutting anything. The layers begin at varying lengths depending on whether you wish to broaden a narrow face, make a round face appear thinner, or simply give your straight hair some movement. Mid-length hair is just right for layering because it is both long enough and short enough. Now let’s move onto the hairstyles!
1. Curtain Bangs with Face-Framing Layers
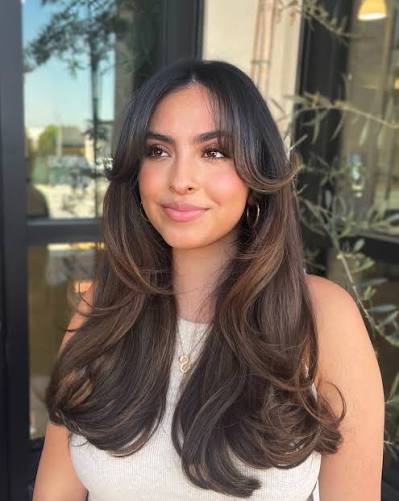
It’s everywhere at the moment, and trust me, it deserves all the buzz. The curtain bangs are parted right down the middle and seamlessly merge with longer layers which sweep back to your ears. It uses a technique called middle parting and gradation where the shortest length is just below the eyebrows and increases in length until the collarbone.
The perfect face shapes for this hairstyle include oval, square, and heart shapes. It is flattering on straight and wavy hair, although girls with curls can get away with it using a diffuser. Round brush and light hold mousse are needed to help the bangs curl outwards and not downwards.
Tip: Dry the bangs away from the face first and then curl them inward using a cold blast of air. This hairstyle will immediately solve the “I look like my face is too long” problem and will change from weekend hair into office-ready hair in less than ten minutes.
2. Long Layered Shag with Face-Framing Pieces
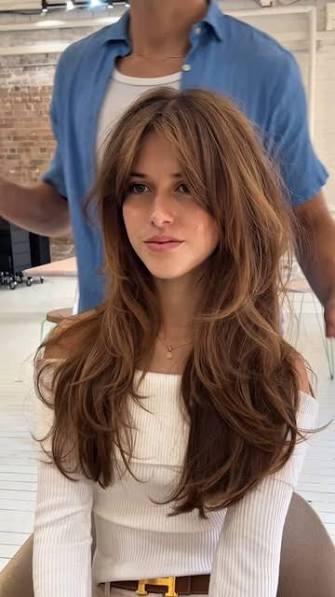
The shag is having a full-blown revival, and mid length hair is honestly its best canvas. This cut uses heavy, choppy layering throughout with the shortest face-framing pieces starting at chin length. The result? Tons of texture and movement without losing overall length.
Thick and wavy hair types benefit the most here since the layers remove bulk while keeping body. Fine hair can pull it off too, but ask your stylist to point-cut the ends rather than blunt-cut them, so it doesn’t look thin. A texturizing spray and a bit of dry shampoo at the roots gives you that lived-in, “I didn’t try too hard” finish.
This style is a lifesaver for anyone dealing with limp, one-dimensional hair. It’s low-maintenance for daily wear but still photographs gorgeously for events when you add a bit of shine serum.
3. Money Piece Face-Framing Layers
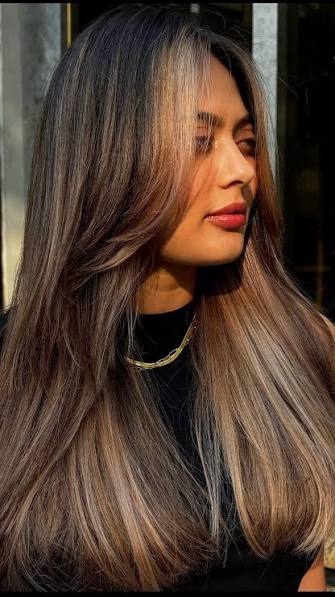
When you need both color and cut, here it is. “Money piece” is a term that is used when it comes to bright, intense balayage highlights applied directly to face-framing layers which are one or two shades lighter than other hair color. It is called this way because it looks very fancy indeed.
The method flatters any facial structure since all the hard work is done with the help of coloring rather than cutting length. The best hair type for it would be either straight or wavy since it allows highlights to play with light while moving. For the sake of preserving the brightness of the hair, use color-safe shampoo and a spray to protect them from UV rays.
You can try asking your colorist to do a “face-framing balayage.” It is a common request, and all the good salons will have this kind of technique in their arsenal. It fixes the issue of dullness caused by plain layers alone.
4. Wispy Face-Framing Layers with Side Part
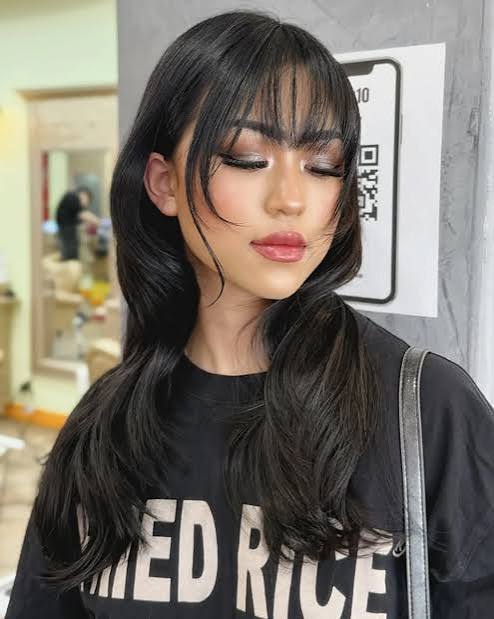
Soft, feathery, and barely-there — that’s the vibe here. Wispy layers are cut using a razor or slide-cutting technique to create fine, see-through pieces near the face rather than one thick chunk. Paired with a deep side part, this style softens angular features beautifully.
Square and long face shapes benefit most from this softening effect. Fine to medium hair textures work best since thick hair can sometimes make wispy layers look bulky instead of airy. A lightweight texturizing cream applied to damp hair, then air-dried or rough-dried with fingers, keeps the wispiness intact without weighing it down.
This cut is perfect for anyone who wants low-maintenance elegance — think brunch with friends or a laid-back workday. It solves the “harsh features” concern many women with strong jawlines mention to their stylists.
5. Face-Framing Layers with Blunt Ends
Here’s a style for the minimalists. Instead of choppy or wispy layers, this version keeps blunt, straight-across ends throughout the length while only the face-framing pieces are layered shorter. It’s a nice contrast of structure and softness.
This works exceptionally well on straight, thick hair because the blunt ends look sleek and healthy, while the shorter framing pieces keep things from looking too severe around the face. Round and oval faces suit this the most. A flat iron and a smoothing serum are really all you need to maintain the polished look.
This cut is a great pick for the office or formal events where you want to look put-together without extra effort. It solves the “too much layering looks messy” complaint some women have about heavily layered cuts.
6. C-Shaped Face-Framing Layers
The C-shape layer curves inward toward the chin, literally forming a “C” around your face when you look in the mirror. This is achieved through precise point-cutting along the jawline and cheek area, blending seamlessly into the rest of the mid length hair.
Round faces love this cut because the inward curve creates the illusion of length. Wavy and straight textures both work well, though a curling iron with a large barrel helps enhance the curve on straight hair that tends to fall flat. Use a light-hold spray to keep the curve from drooping by midday.
This style is a go-to for special events since it photographs incredibly well from the front. It solves the “I look too round in photos” issue many women mention before big occasions.
7. Face-Framing Layers with Balayage
Different from the money piece, this style spreads soft, sun-kissed balayage throughout the entire length, with special attention to how it highlights the layered pieces framing the face. It’s subtler and more blended than the concentrated money piece look.
This suits every face shape since it’s really about dimension rather than shape correction. It’s ideal for straight to wavy hair with medium to thick density. A color-depositing conditioner every few washes helps maintain the tone between salon visits.
This is a fantastic low-maintenance color option because balayage grows out naturally without harsh regrowth lines. It solves the “I don’t have time for root touch-ups” problem so many busy women face.
8. Choppy Face-Framing Layers for Thick Hair
Thick hair often feels heavy and hard to style, and choppy layers fix that fast. This technique uses a razor to remove weight in chunks around the face, creating movement and reducing bulk without sacrificing length.
Square and heart-shaped faces do particularly well with this style since the choppiness softens strong jawlines. As the name suggests, this is specifically designed for thick, coarse hair textures. A lightweight mousse applied to damp hair before diffusing keeps the choppiness looking intentional rather than frizzy.
This cut is a genuine problem-solver for anyone who’s said “my hair feels like a helmet.” It’s casual enough for daily wear but can be dressed up with a bit of texturizing spray for evening events.
9. Soft Face-Framing Layers for Fine Hair
Fine hair needs a gentler approach, and this style delivers exactly that. Instead of heavy layering, the stylist creates subtle, soft pieces around the face using point-cutting rather than a razor, which can fray already-thin strands.
Oval and heart-shaped faces work well with this softer framing. This cut is built specifically for fine, thin hair densities where volume is the main concern. A volumizing mousse at the roots, combined with a round brush blow-dry, adds the lift this hair type craves.
This look solves the “my hair looks stringy” worry that fine-haired women often bring up. It works beautifully for both casual days and more polished looks with a bit of added texture spray.
10. Face-Framing Layers with Center Part
Simplicity at its finest. This style relies on a precise center part with symmetrical face-framing layers cascading down each side, creating balance and structure. The cutting technique focuses on even lengths on both sides for a clean, mirrored effect.
Oval and long face shapes suit this best since the symmetry adds width visually. Straight hair looks the most polished with this part, though wavy hair adds a nice softness to the symmetry. A flat iron for touch-ups and a shine spray keep this look sleek.
This cut is ideal for professional settings and formal events where a clean, classic appearance matters. It solves the “my hairstyles look unbalanced” issue some women notice in photos.
11. Butterfly Layers with Face-Framing Pieces
Butterfly layers are the internet’s current obsession, and for good reason. This technique creates dramatic, voluminous layers throughout with the face-framing pieces cut shortest and most pronounced, resembling butterfly wings when styled.
This flatters nearly every face shape thanks to its versatility. It’s best suited to medium to thick, wavy or straight hair. A large-barrel curling iron creates the voluminous flip these layers are known for, and a texturizing spray finishes the look.
This is a great pick for anyone bored of flat, one-dimensional layering. It works for both casual outings and dressed-up occasions when curled for extra volume.
12. Face-Framing Layers with Bottleneck Bangs
Bottleneck bangs are longer, wispy bangs that taper inward like a bottle’s neck before blending into face-framing layers. This creates a soft, romantic frame without committing to full bangs.
Round and square faces benefit from the elongating effect. This works on straight to wavy hair textures, and it’s less demanding on curly hair since the bangs are longer and easier to manage. A small round brush helps train the bangs during blow-drying.
This solves the “I want bangs but I’m scared of commitment” dilemma since bottleneck bangs blend into the rest of your length easily as they grow.
13. Long Face-Framing Layers with Highlights
For those who want length but still crave dimension, this style keeps face-framing layers longer, starting around the collarbone, paired with subtle highlights woven through for extra brightness and depth.
This suits oval and heart-shaped faces particularly well. It’s versatile across straight, wavy, and loosely curly textures. A hydrating hair mask weekly keeps the highlighted strands from feeling dry or brittle.
This is an easy win for special events since the length and shine combo looks elegant with minimal styling — just a loose curl and you’re done.
14. Face-Framing Layers for Curly Mid-Length Hair
Curly hair deserves its own dedicated cut, and this one respects the natural curl pattern. Layers are cut dry, curl by curl, so each piece springs back into its true shape, with face-framing layers shaped to enhance natural curl clusters near the cheeks.
This works for every face shape since curls naturally soften angles. Obviously, this is designed specifically for curly and coily textures. A curl cream and diffuser are non-negotiable tools here.
This solves the age-old “layers ruined my curls” fear that keeps so many curly-haired women stuck with one-length cuts for years.
15. Face-Framing Layers with Micro-Fringe
A bold choice for the adventurous. Micro-fringe bangs sit high on the forehead and blend into slightly longer face-framing layers, creating a striking, editorial-inspired look.
This works best on oval and heart-shaped faces with strong features to balance the boldness. Straight, fine to medium hair holds this style best. A small flat iron helps keep the micro-fringe crisp and separated.
This is a statement style perfect for creative industries or special events where you want to stand out. It’s not the lowest maintenance option, but it solves the “I want something completely different” itch.
16. V-Cut Face-Framing Layers
The V-cut creates a dramatic point at the back while the front features soft, face-framing layers that balance the boldness of the back cut. It’s a nice mix of edgy and soft.
This suits round and square face shapes well since the front softness balances angular jawlines. It works on thick, straight to wavy hair best, as the V-shape needs enough density to show clearly. A flat iron and light-hold spray keep both elements defined.
This solves the “I want drama without going full edgy” concern, working for both casual days and dressier occasions.
17. Face-Framing Layers with Wolf Cut Elements
The wolf cut blends shag and mullet energy, and adding face-framing layers to it softens what could otherwise be a harsh style. Heavy layering throughout meets shorter, textured pieces around the face for a lived-in, rock-and-roll vibe.
This flatters oval and square faces particularly well. It’s made for thick to medium, wavy or curly textures where texture can really shine. A texturizing paste worked through dry hair completes the effect.
This is ideal for anyone wanting a low-maintenance, effortlessly cool everyday look that still turns heads at casual events.
18. Feathered Face-Framing Layers
A throwback with a modern twist, feathered layers flip outward slightly at the ends, especially around the face, giving a soft, retro-inspired movement. This is achieved through slide-cutting techniques and finished with a round brush blow-dry.
Round and heart-shaped faces do well with this outward flip. Straight to slightly wavy hair textures show this technique best. A volumizing spray at the roots and a medium round brush are essential tools.
This solves the flat, lifeless hair problem many women experience with one-length cuts, working well for both work settings and evening events.
19. Face-Framing Layers with Root Shadow
This style pairs a soft, shadowed root with lighter face-framing layers for a low-maintenance color option that still looks intentional and dimensional. The cutting technique itself stays fairly classic, letting the color placement do the talking.
This works for every face shape since it’s color-focused rather than cut-focused. It suits straight to wavy, medium to thick hair. A purple or blue toning shampoo (depending on your base color) keeps brassiness at bay between salon visits.
This solves the “I hate seeing my roots grow out” frustration since the shadow root blends naturally over time.
20. Textured Face-Framing Layers with Waves
Last but definitely not least, this style combines loose, beachy waves with soft face-framing layers for an effortless, tousled finish. The layers are cut to enhance wave pattern rather than fight against it.
This suits nearly every face shape thanks to its soft, undefined nature. It’s perfect for naturally wavy hair, though straight hair can achieve it with a curling wand and sea salt spray. Texturizing spray is the finishing touch here.
This is the ultimate low-maintenance, everyday style — perfect for casual days out but easily upgraded for events with a bit more curl definition.
Face Shape Guide for Face-Framing Layers
| Face Shape | Best Styles From This List | Why It Works |
|---|---|---|
| Round | C-Shaped Layers, Bottleneck Bangs, Feathered Layers | Elongates and adds vertical movement |
| Square | Wispy Layers, Choppy Layers, V-Cut | Softens strong jawline angles |
| Oval | Curtain Bangs, Center Part, Long Layers with Highlights | Nearly all styles work; balance is key |
| Heart | Money Piece, Long Highlights, Wolf Cut Elements | Balances wider forehead, narrows chin visually |
| Long | Wispy Layers, Center Part, Butterfly Layers | Adds width and horizontal movement |
Hair Type and Maintenance Breakdown
| Hair Type | Recommended Styles | Daily Styling Time | Maintenance Level |
|---|---|---|---|
| Straight | Blunt Ends, Center Part, Feathered Layers | 10–15 minutes | Low to Medium |
| Wavy | Butterfly Layers, Balayage Layers, Textured Waves | 5–10 minutes | Low |
| Curly | Curly Face-Framing, Wolf Cut Elements | 15–20 minutes | Medium |
| Thick | Choppy Layers, V-Cut, Wolf Cut | 15 minutes | Medium |
| Fine | Soft Layers, Wispy Layers, Micro-Fringe | 10 minutes | Low to Medium |
Tips for Success
- Bring reference photos, but be realistic. Your stylist needs to see the vibe, but factor in your actual hair density and texture before expecting an identical result.
- Ask about “dry cutting” for curly hair. Curls behave differently wet versus dry, so a dry cut ensures accurate face-framing placement.
- Invest in a good round brush. Most face-framing layers rely on this single tool for shaping during blow-dry.
- Get regular trims every 8–10 weeks. Face-framing pieces grow out faster than the rest of your hair since they’re shorter to begin with.
- Match your part to your layers. A side part with center-cut layers (or vice versa) can throw off the whole effect.
Common Mistakes and How to Avoid Them
- Mistake: Choosing a style based on Pinterest alone
- Fix: Bring photos, but let your stylist adjust the technique based on your actual density, texture, and face shape.
- Mistake: Skipping heat protectant
- Fix: Always apply heat protectant spray before blow-drying or flat-ironing face-framing layers, since they’re often styled daily.
- Mistake: Over-layering fine hair
- Fix: Ask for point-cutting instead of heavy razor work to avoid thinning out already-delicate strands.
- Mistake: Ignoring natural texture
- Fix: Cut with your hair’s natural wave or curl pattern in mind rather than forcing a straight-hair style onto curly hair.
- Mistake: Not communicating length expectations
- Fix: Be specific about where you want the shortest layer to land — collarbone, chin, or cheekbone — since even an inch changes the whole look.
Wrapping It Up
Mid length hair with face framing layers really is one of the most versatile cuts out there. Whether you’ve got thick waves, fine straight strands, or natural curls, there’s a version of this style that’ll work with your hair, not against it.
I hope this list gave you a clearer picture of what to ask for at your next salon appointment. Print out your favorite, bring it in, and trust your stylist to make it work for your unique face shape and texture.