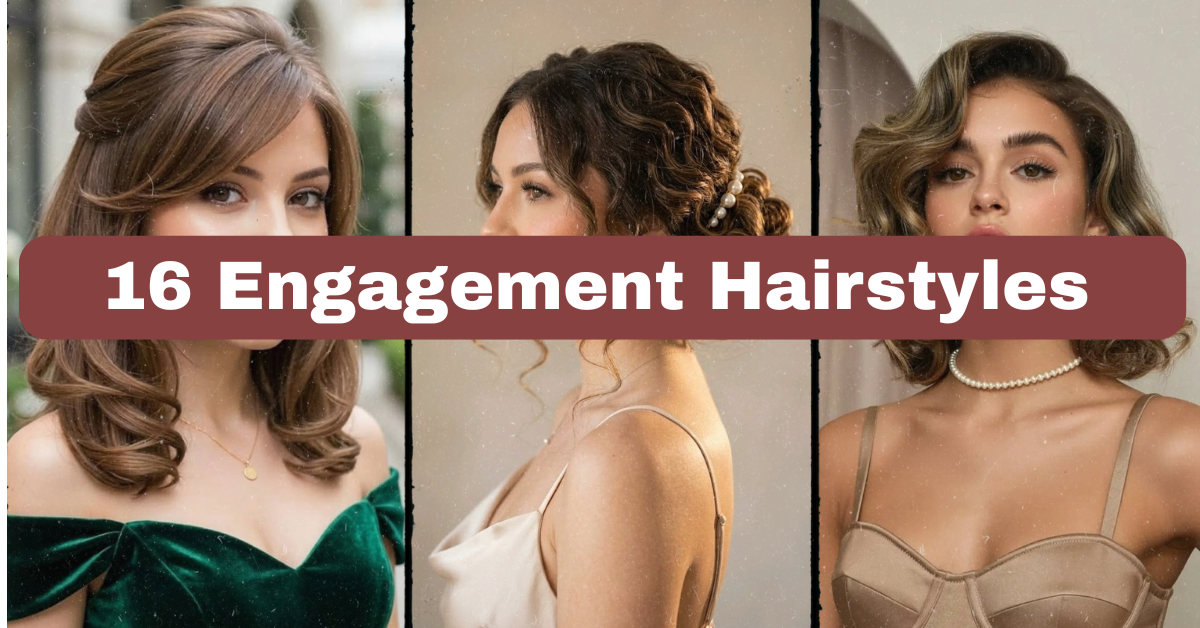
16 Engagement Hairstyles That’ll Make Your Photos Absolutely Stunning
As someone who assisted more than 50 women in choosing the most flattering engagement hairstyles for their photoshoots, I have firsthand experience of what makes an amazing hairstyle when you have to pose for several hours in front of a camera. Combining my own experience of trial-and-error as well as the feedback that comes from actual photo shoots, I’ll give you insider information on what really works rather than the pretty yet impractical Pinterest shots.
So which engagement hairstyles look best in pictures? The best engagement hairstyles are a combination of your style preferences and your hairstyle needs that will make sure that you will photograph perfectly both indoors and outdoors in natural light and your hairstyle stays in place for as long as needed. Your hair length, your hair type, your dress neckline, and even your desired look (elegant or romantic) should be taken into account here.
Here come 16 amazing ideas for your engagement hairstyles and tips on what really works!
Why Your Engagement Photo Hairstyle Actually Matters
Here’s the thing nobody mentions: your engagement hairstyle isn’t just about looking pretty for one afternoon. These photos become save-the-dates, get printed for grandma’s mantel, and live forever on social media. You want something that feels like you, photographs well from multiple angles, and doesn’t require a touch-up every twenty minutes.
I’ve seen brides show up with gorgeous Pinterest inspiration only to realize their hair type won’t cooperate, or the style doesn’t match their dress. That’s exactly what I’m fixing today. Every style below comes with real talk about hair type suitability, face shape considerations, and the styling products you’ll actually need.
1. Classic Low Bun
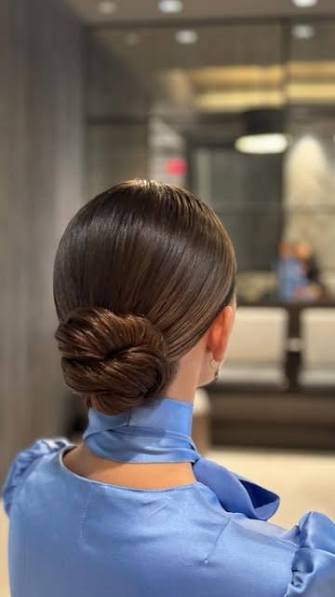
This style works because it’s timeless—your grandkids will look at these photos in fifty years and still think you look chic. The technique involves smoothing hair back into a low, sleek bun at the nape of your neck, using a light-hold gel to eliminate flyaways.
This suits straight to wavy hair best, though curly hair can work with extra smoothing serum. It flatters oval and heart-shaped faces particularly well since it doesn’t add width. Medium to long hair gives you the most bun volume, but shorter hair (even shoulder-length) can work with hair extensions clipped in for extra fullness.
Practical tip: prep with dry shampoo the night before for texture that actually holds pins better than freshly washed hair. This style solves the “I want elegant but not fussy” problem perfectly—it’s formal enough for a photographer but comfortable enough to wear all day.
Moving from sleek sophistication, let’s talk about a style that brings in movement and softness.
2. Loose Beach Waves

Beach waves feel effortless, but there’s actual technique behind that “just rolled out of bed but somehow perfect” look. You’re creating loose, undefined waves using a curling wand (1.5-inch barrel works best), then brushing through with fingers—never a brush—to break up the curl pattern.
This style is incredibly versatile across hair types. Fine hair benefits from a texturizing spray before curling for grip; thick hair might need a lightweight mousse to control frizz without weighing down the waves. Nearly every face shape looks great with beach waves since the movement adds softness without adding bulk.
Styling tip: curl away from your face on alternating sections for a natural, undone look rather than a uniform curl pattern. This works beautifully for outdoor engagement shoots—beaches, parks, golden hour fields—anywhere with a relaxed, romantic vibe.
Now let’s dial up the romance factor with something a bit more intricate.
3. Half-Up Half-Down with Fishtail Braid
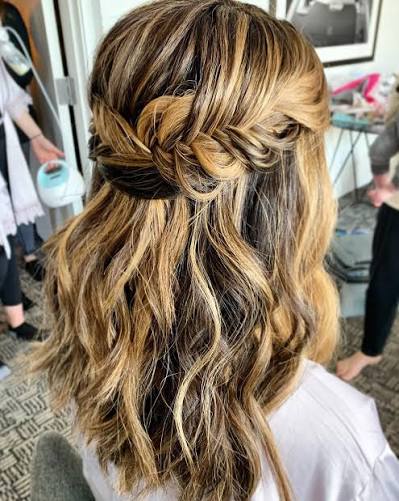
This hairstyle gives you the best of both worlds—hair pulled back from your face for clear photos, but still flowing and romantic. You’re sectioning the top half of your hair, fishtail braiding it, then securing it at the back while leaving the bottom half loose and wavy.
Curly and wavy hair textures work exceptionally well here since the braid adds structure while the loose hair keeps things soft. This flatters round and square face shapes especially, since the half-up portion elongates your face shape. Medium to long hair length is ideal—you need enough hair to actually braid.
Quick tip: tug gently on the braid sections after braiding to loosen it slightly for that lived-in, romantic texture. This solves the “I can’t decide between updo and down” dilemma completely.
Let’s shift gears now toward something with major vintage appeal.
4. Vintage Finger Waves

Finger waves scream old Hollywood glamour, and honestly? They photograph incredibly well because the defined S-shaped waves catch light beautifully. This technique involves using styling gel and a fine-tooth comb to create precise, flat waves close to the scalp.
This style works best on straight to slightly wavy hair with a medium to fine texture—thick, coarse hair fights against the flat wave pattern. Short to medium bob-length hair actually showcases this style best. Oval and heart-shaped faces suit finger waves particularly well since the waves frame the face without adding bulk.
Here’s my tip: work in small sections and use bobby pins to hold each wave while it sets, removing them only once completely dry. This creates that dramatic, editorial vibe perfect for indoor studio shoots or vintage-themed engagement sessions.
From vintage glamour, let’s move to something with a boho, free-spirited energy.
5. Boho Braided Crown
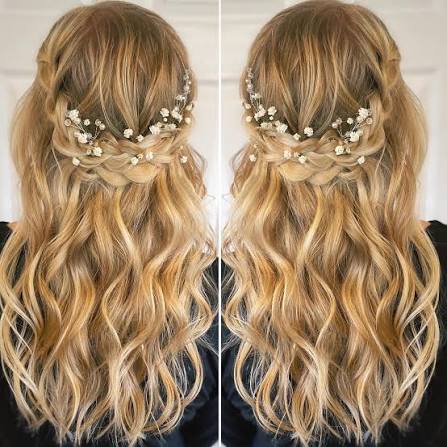
The braided crown gives you flower-child energy without trying too hard. You’re creating two Dutch braids starting at your temples, then crossing and pinning them across the top of your head like a crown, leaving the rest of your hair loose underneath.
This suits medium to long hair with wavy or curly texture best—the braids add visual interest without needing perfectly smooth strands. Round and oval faces work great with this style since the crown adds height. Fine hair might need a texturizing spray first to give the braids enough grip.
Practical advice: pull small pieces loose from the braids after finishing for a relaxed, undone finish rather than tight, competition-braid perfection. This solves the classic “boho but still put-together” balance beautifully for outdoor or rustic-themed shoots.
Next, we’re heading into sleeker territory with a style built for drama.
6. Sleek High Ponytail
Don’t underestimate the high pony—it’s chic, it’s modern, and it photographs incredibly well from the side profile. The technique requires gathering hair high on your crown, smoothing with a boar-bristle brush and gel, then wrapping a small section around the elastic to hide it.
Straight hair naturally suits this style best, though wavy hair works with extra smoothing product. This flatters oval, heart, and square face shapes by drawing attention upward and elongating your neckline. You’ll need medium to long hair for a substantial ponytail; shorter hair benefits from a ponytail extension.
Styling tip: use a fine-tooth comb dipped in gel along your part line to eliminate any flyaways for that polished finish. This creates a modern, editorial vibe perfect for city engagement shoots or formal studio sessions.
Let’s soften things up again with a romantic updo option.
7. Romantic Low Chignon
The chignon feels bridal without being overly formal—it’s that perfect in-between look. This involves twisting hair into a loose knot at the nape of your neck, then gently pulling pieces loose around the twist for texture before securing everything with bobby pins.
This style works beautifully on medium to long hair with any texture, though curly hair creates the most romantic, textured version. Nearly every face shape suits this style since you control how much volume sits at the crown versus the nape. Fine hair benefits from teasing at the crown first for added volume.
Here’s my go-to tip: don’t smooth everything perfectly—leave some face-framing pieces loose for softness around your features. This solves the “elegant but approachable” balance that so many brides want for their engagement photos.
Now, let’s talk texture with a completely different braiding technique.
8. Textured Top Knot
The top knot brings an effortlessly cool, slightly undone energy that works surprisingly well for engagement shoots. You’re gathering hair at the crown, twisting it into a loose bun, and leaving some texture rather than pulling everything painfully smooth.
This style flatters oval and round faces especially well by adding height at the crown. Wavy and curly hair types create the best texture naturally, though straight hair works fine with a texturizing spray beforehand. Medium to long hair gives you enough length for a substantial knot; very short hair won’t have enough length to work with.
Quick tip: use your fingers instead of a brush when gathering hair for the knot—this preserves natural texture and prevents that overly smooth, dated look. This creates a relaxed, “I woke up like this” vibe perfect for casual outdoor engagement sessions.
Moving on, let’s explore a side-swept option that’s incredibly flattering.
9. Side-Swept Curls
Side-swept curls create asymmetry that’s genuinely flattering for photos, especially profile shots. This technique involves curling hair with a wand, then sweeping everything over one shoulder and pinning loosely at the crown to keep it in place.
This style suits most hair textures beautifully, from straight hair (which holds curl with proper prep) to naturally curly hair (which just needs some definition and shine serum). Round and square face shapes benefit most since the asymmetry adds visual interest without symmetry that can look flat. Medium to long hair works best here.
My tip: curl hair away from your face and use a small amount of shine serum on the ends only to avoid weighing down your roots. This solves the “which side is my good side” problem by literally giving you one dramatic side.
Let’s transition into braided territory again with a slightly different technique.
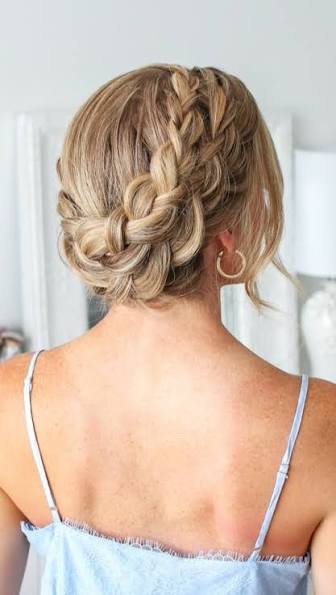
10. Fishtail Braid Updo
This updo takes the classic fishtail braid and elevates it into a full updo by wrapping and pinning the braid into a circular pattern at the nape or crown. It’s intricate-looking but honestly easier to master than it appears.
Thick, wavy hair creates the most dimension in this style, though fine hair works well with some texturizing spray for grip. This flatters oval and heart-shaped faces since the updo keeps attention on your facial features. You’ll need long hair (at least bra-strap length) to have enough length for both the braid and the wrapping.
Styling tip: braid slightly looser than you think you should—tight braids don’t wrap as smoothly and look less natural in photos. This creates a sophisticated, intricate look ideal for formal engagement sessions or garden party settings.
Now let’s simplify things with a style that requires almost no effort.
11. Classic Blowout
Sometimes the simplest option photographs the absolute best. A proper blowout—hair dried smooth and voluminous using a round brush—creates that glossy, healthy look that never goes out of style.
This works on straight to wavy hair textures best; naturally curly hair would need significant heat styling to achieve this smooth result. Every face shape benefits from a well-done blowout since you can customize the volume placement (more volume at the crown for round faces, more volume at the jaw for narrow faces). Medium to long hair shows off the movement best.
Practical tip: finish with a cool shot from your blow dryer to lock in shine and reduce frizz before applying a light serum. This creates that “expensive salon blowout” look perfect for indoor studio shoots or formal engagement portraits.
Let’s add some drama with accessories in our next style.
12. Twisted Updo with Hair Accessories
Adding a decorative comb, delicate pins, or small flowers to a simple twisted updo instantly elevates the entire look. The base technique involves twisting sections of hair and pinning them into a loose, textured updo, then adding your chosen accessory as the finishing touch.
This style works on nearly any hair type and length, from fine straight hair to thick curly hair, since the accessory becomes the focal point regardless of texture. Oval and heart-shaped faces particularly benefit since the updo keeps focus on facial features while the accessory adds personality.
Here’s my tip: choose accessories that complement your engagement ring or dress details rather than competing with them. This solves the “I want something special but not over-the-top” problem, and it’s ideal for garden, vineyard, or slightly formal outdoor settings.
Let’s return to natural texture with an easy, curl-embracing option.
13. Natural Curls with Side Part
If you’ve got natural curls, your engagement shoot is the perfect time to let them shine—literally. This “style” is really about defining and enhancing what you’ve already got using a curl cream and diffuser attachment on your blow dryer.
This obviously works best for naturally curly or coily hair textures. Round and oval faces suit this style beautifully since curls add volume and movement around the face. Any length works, from a curly bob to long ringlets, since you’re celebrating your natural texture rather than forcing a specific shape.
Styling tip: apply curl cream to soaking wet hair (not just damp) for maximum curl definition and reduced frizz. This solves the age-old struggle curly-haired women face of feeling pressure to straighten for “special occasions”—your natural texture IS special occasion-worthy.
Next, let’s look at a sleek, modern alternative for straight hair lovers.
14. Sleek Straight with Deep Side Part
Pin-straight hair with a deep side part creates a modern, editorial look that photographs beautifully, especially in profile. This requires flat-ironing hair completely smooth, then creating a deep side part (rather than center part) for asymmetrical interest.
This obviously works best on naturally straight hair, though wavy hair can be flat-ironed for this look too (curly hair would require significant heat and time). This particularly flatters square and round face shapes by creating asymmetry and visual length. Medium to long hair shows off the sleekness most dramatically.
Practical tip: use a heat protectant spray before flat-ironing, then finish with a lightweight shine spray (not oil, which can look greasy in photos) for that glass-like finish. This creates a sophisticated, modern vibe perfect for urban or minimalist engagement photo settings.
Let’s shift toward a soft, romantic braided option next.
15. Soft Waterfall Braid
The waterfall braid creates the illusion of hair cascading like water while keeping strands secured off your face. This technique involves braiding horizontally across the back of your head while “dropping” pieces from the braid to fall naturally with your loose hair underneath.
This style works beautifully on medium to long hair with wavy or curly texture, since the dropped pieces blend more naturally with existing waves. Oval and heart-shaped faces suit this look especially well. Fine, straight hair can work but may need a curling wand to add texture to the “waterfall” pieces so they blend properly.
My tip: curl your hair before starting the braid—it makes the whole waterfall effect look more intentional and cohesive rather than just messy. This creates a whimsical, romantic vibe that’s perfect for outdoor garden or vineyard engagement sessions.
Finally, let’s close out with one more braided crown variation that’s slightly different from our earlier boho option.
16. Loose Fishtail Half-Up Style
This final style combines a loose fishtail braid with a half-up silhouette, creating textured interest without a full updo commitment. You’re taking a small section from each side of your head, fishtail braiding them, then joining and pinning them together at the back.
This works on nearly any hair texture, though wavy and curly hair create the most visually interesting braid texture. Every face shape benefits since you control exactly how much face-framing happens based on how much hair you leave down. Medium to long hair works best for having enough length to braid comfortably.
Quick tip: pull gently on the braid to loosen and widen it slightly after securing, creating that soft, romantic texture rather than a tight, gymnastics-competition braid. This solves the “half committed to an updo” indecision perfectly, giving you elegance with ease.
Comparing Engagement Hairstyles by Face Shape
| Face Shape | Best Suited Styles | Styles to Avoid |
|---|---|---|
| Round | Half-up braids, top knot, side-swept curls | Center-parted sleek styles that add width |
| Oval | Nearly everything works—low bun, chignon, blowout | Very few restrictions |
| Square | Side-swept curls, waterfall braid, deep side part | Blunt, straight center-parted styles |
| Heart | Fishtail updo, finger waves, chignon | Styles that add excessive volume at temples |
| Long | Textured top knot, braided crown | High ponytail can elongate too much |
Comparing Engagement Hairstyles by Hair Type
| Hair Type | Recommended Styles | Products Needed |
|---|---|---|
| Straight | Sleek ponytail, finger waves, blowout | Heat protectant, smoothing serum, flat iron |
| Wavy | Beach waves, half-up braid, chignon | Texturizing spray, light mousse |
| Curly | Natural curls style, boho crown, waterfall braid | Curl cream, diffuser, defining gel |
| Fine/Thin | Textured top knot, low bun with extensions | Volumizing mousse, dry shampoo |
| Thick | Fishtail updo, twisted updo, side-swept curls | Smoothing serum, strong-hold pins |
Tips for Success
Getting your engagement hairstyle right isn’t just about picking a pretty picture—here’s what actually makes the difference on shoot day.
- Do a trial run at least two weeks before your actual shoot, ideally with the same products you’ll use on the day
- Consider your dress neckline—updos work great with statement necklines or off-shoulder dresses, while loose styles complement simpler necklines
- Think about your venue’s weather—humidity kills sleek styles fast, so have a backup plan with anti-frizz spray if you’re shooting somewhere humid
- Bring touch-up supplies—travel-size hairspray, bobby pins, and a small comb should live in your shoot-day bag
- Match your hairstyle formality to your outfit—casual engagement outfits pair better with loose waves or half-up styles rather than formal updos
- Photograph test shots during your trial run, not just look in a mirror—hair that looks fine in person sometimes photographs differently
Common Mistakes and How to Avoid Them
Mistake: Trying a brand-new style for the first time on shoot day. Your hairstylist (or you, if DIY) needs practice runs to perfect technique and timing. Always test styles beforehand.
Mistake: Ignoring weather conditions. Outdoor shoots in humidity or wind require different product strategies than indoor studio sessions. Ask about your location and plan accordingly.
Mistake: Overdoing product application. Too much gel, hairspray, or serum creates a stiff, unnatural look that reads poorly in photos. Less is genuinely more—you can always add more if needed.
Mistake: Choosing a style that doesn’t match your comfort level. If you never wear updos in daily life, an elaborate updo might feel foreign and show in your expressions. Pick something that feels like an elevated version of your everyday style.
Mistake: Forgetting about movement. Engagement shoots often involve walking, laughing, twirling—styles need to hold up through motion, not just look pretty standing still. Test your hairstyle by moving around, not just posing.
Mistake: Not considering your partner’s height or the poses you’ll do. If there’s a lot of dipping, hugging, or head-tilting in your planned poses, make sure your hairstyle won’t collapse or shift dramatically.
Wrapping It All Up
Finding the right engagement hairstyles comes down to knowing your hair type, understanding what flatters your face shape, and choosing something that feels authentically you—not just something trendy. Whether you go with romantic loose waves, an elegant updo, or embrace your natural curl pattern, the best choice is one you’ll feel confident wearing for hours while creating memories you’ll treasure forever.
I hope this guide gave you the clarity (and maybe some genuine excitement) you needed for picking your perfect look. Take these engagement hairstyles to your stylist, or try them yourself with the tips I’ve shared—either way, you’re going to look absolutely radiant in those photos.